Saturday, August 20, 2011

Setting up a LAMP Stack in Fedora 14

In this post let us see how to setup a LAMP Stack. LAMP is an acronym for a solution stack of free, open source software, originally coined from the first letters of Linux (operating system), Apache HTTP Server, MySQL (database software) and Perl/PHP/Python, principal components to build a viable general purpose web server.

Setting up this LAMP stack is essential for you to design websites and test it in your local computer.


1. Installing MySQL 5

To install MySQL type the following command in the Terminal:

yum install mysql mysql-server

In order to make MySQL start automatically whenever the system boots, type

chkconfig --levels 235 mysqld on

To Start the MySQL server

/etc/init.d/mysqld start

To set password for MySQL enter,

mysql_secure_installation

The intial password for 'root' is nothing.. So just press enter..It will prompt if you want to change it. Then press 'Y', current password "blank(press enter)" and enter the new password what you want..

2. Installing Apache 2

To install Apache 2 enter the following command

yum install httpd

Now configure your system to start Apache at boot time...

chkconfig --levels 235 httpd on

To start Apache

/etc/init.d/httpd start

To check if it has been installed,

Go to the browser and enter http://localhost

You must see a Fedora Test Page.


3. Installing PHP 5

Enter the following command

yum install php

Then restart apache,

/etc/init.d/httpd restart

The default directory for all PHP files is /var/www/html.

So place any .php file there and then test it as http://localhost/YourFileName.php.

4. Installing MySQL (to be used with PHP)

Enter the following command

yum install php-mysql 

Restart the apache as mentioned in the previous step. 

5. Installing PhpMyAdmin

phpMyAdmin is a free software tool written in PHP intended to handle the administration of MySQL over the World Wide Web. phpMyAdmin supports a wide range of operations with MySQL. The most frequently used operations are supported by the user interface (managing databases, tables, fields, relations, indexes, users, permissions, etc), while you still have the ability to directly execute any SQL statement.

To install PhpMyAdmin enter the following:


yum install phpmyadmin 

Restart Apache.  

Thats it!!! Its done. Now you are ready to use LAMP...:) 

Monday, July 25, 2011

Cyborgs 2k11

Cyborgs 2k11 (Brain over Brawn)


Cyborgs 2k11 is a National Level Technical Symposium conducted by the Department of Computer Science and Engineering at Valliammai Engineering College,Chennai, on 11th and 12th of August, 2011.

Following the grand success of Cyborgs 09, the CS Adroits association is back with yet another mega event of the year, CYBORGS 2K11.

CYBORGS 2K11 will be a showcase of the skills of some of the best Brains in the country. On the floor, is a plethora of challenging events testing your technical and non-technical skills that spans over two days. We are very proud to welcome you to this Brain Stimulating event and have absolute fun and frolic with our CS Adroits Family. Participate, Enjoy, Succeed, Shine. Its time to prove the might of Brain over Brawn.

Prizes Worth Rs.1,00,000 to be won!!!

List of Events in Cyborgs 2k11

  • Thesis Cast (Paper Presentation)
  • Bug Busters (Debugging)
  • Top Coders (Programming)
  • Tech Trivia (Quiz)
  • Ad-Zap
  • Show Bruta (Dumb C)
  • Picturesque (Bingo!)
  • Battle of the Gamers
  • Picaso on Picasa (Digital Art)
  • Puzzle Tuzzle
Our Website - http://cyborgs2k11.com/

Our Chief Guest - Mr.Kiruba Shankar

Our Media Partner


Wednesday, June 1, 2011

Virtualisation Environment

Task / Aim

Virtualisation environment (e.g., xen, kqemu or lguest) to test an applications, new kernels and isolate applications. It could also be used to expose students to other alternate OSs like *BSD

Procedure


What is Virtualisation?

Virtualisation, in computing, is the creation of a virtual (rather than actual) version of something, such as a hardware platform, operating system, a storage device or network resources.

So what we are going to do is to install another operating system say 'Ubuntu' within our host operating system 'Fedora'. Now the 'Ubuntu' contained within the virtual machine is called as the guest Operating System. The software that we are going to use to perform this is the open source software called 'Qemu'


Installing Ubuntu within Fedora using QEMU


  1. The first step involved here is to download the QEMU source code (if it is not already present). You can perform this download by clicking the following link Download QEMU Source code
  2. Next task is to build the emulator from the source code. Go the folder where you have downloaded the source code in the terminal and enter the following two commands:

    • $ tar -zxvf qemu-0.14.0.tar.gz
    • $ cd qemu-0.14.0

  3. Next we are going to configure the qemu script such that it is built for i386 architecture. However it supports various other architectures like ARM, PPC, SPARC etc. Enter the following command:

    • $ ./configure --target-list=i386-softmmu

    (Before doing this make sure you have installed Header files and libraries for zlib development. If you haven't then go to 'Add/Remove software' app in Fedora and do it and then configure your script)
  4. Once you are done with configuring now you have to install it. For doing so, you must login as root in your terminal using the 'su' command. After that use the 'make' command to install it.

    • $ su
    • Password: (This is not a command, but will come when you enter su)
    • # make install

  5. Now you have installed qemu. Next step is to create the virtual machine. The first step in that is to create a Virtual Hard disk image for that. For our Ubuntu OS let us a create an Hard disk of size 10 GB. To create that go to a folder where you want to create the hard disk image and enter the following:

    • $ qemu-img create ubuntu.img 10G
    • $ ls -lh ubuntu.img (To check)

  6. So you have created the hard disk. What next??? Yes..To install Ubuntu into it. You have to download ubuntu and place its .iso image in the current working directory.
    Then execute the following commands

    • qemu -hda ubuntu.img --boot d -cdrom ./ubuntu-10.10-desktop-i386.iso -m 512

    In the above command, '-hda' option specifies the disk image file, '-cdrom' is the CD-ROM or iso image to be used and '-m' option specifies the memory to be allocated for the guest OS. In this case it is 512 MB of RAM.

    Now our Virtual machine is ready. Just got to install ubuntu in it. The screenshot is given below:

** Here we have build the software from the source. If you find it complicated you can always use fedora's "yum".... Just install using the command 'yum install qemu' and after that see 5th and 6th points given here.

*** This may be revised in future. Stay tuned for updates. If you find any problem or have any suggestions for improvements, you can always mail me.

By G.Vivek Venkatesh

Sunday, May 29, 2011

Implementation of AVL Tree

In this post I will give the C program for the implementation of AVL tree.

AVL TREE


In computer science, an AVL tree is a self-balancing binary search tree, and it was the first such data structure to be invented.In an AVL tree, the heights of the two child subtrees of any node differ by at most one. Lookup, insertion, and deletion all take O(log n) time in both the average and worst cases, where n is the number of nodes in the tree prior to the operation. Insertions and deletions may require the tree to be rebalanced by one or more tree rotations.

ALGORITHM


Program written based on the algorithm given in the book "Data Structures and Algorithm Analysis in C " written by Mark Allen Weiss.

PROGRAM


#include<stdio.h>
#include<conio.h>
#include<malloc.h>
struct avlnode;
typedef struct avlnode *position;
typedef struct avlnode *avltree;
struct avlnode
{
  int element;
  avltree left;
  avltree right;
  int height;
};

avltree makeempty(avltree T)
{
  if(T!=NULL)
  {
    makeempty(T->left);
    makeempty(T->right);
    free(T);
  }
  return NULL;
}

position find(int X,avltree T)
{
  if(T==NULL)
    return NULL;
  if(X<T->element)
    return find(X,T->left);
  else if(X>T->element)
    return find(X,T->right);
  else
    return T;
}

static int height(position p)
{
  if(p==NULL)
    return -1;
  else
    return p->height;
}

static int max(int lhs,int rhs)
{
  return lhs>rhs ? lhs : rhs;
}

static position singlerotatewithleft(position k2)
{
  position k1;
  k1=k2->left;
  k2->left = k1->right;
  k1->right = k2;
  k2->height = max(height(k2->left),height(k2->right))+1;
  k1->height = max(height(k1->left),k2->height)+1;
  return k1;
}

static position singlerotatewithright(position k1)
{
  position k2;
  k2=k1->right;
  k1->right = k2->left;
  k2->left = k1;
  k1->height = max(height(k1->left),height(k1->right))+1;
  k2->height = max(height(k2->right),k1->height)+1;
  return k2;
}

static position doublerotatewithleft(position k3)
{
  k3->left = singlerotatewithright(k3->left);
  return singlerotatewithleft(k3);
}

static position doublerotatewithright(position k1)
{
  k1->right = singlerotatewithleft(k1->right);
  return singlerotatewithright(k1);
}

//////Insert routine

avltree insert(int X,avltree T)
{
  if(T==NULL)
  {
    T=(avlnode*)malloc(sizeof(struct avlnode));
    if(T==NULL)
      return NULL;
    else
    {
      T->element=X;
      T->height=0;
      T->left=T->right=NULL;
    }
  }
  else if(X<T->element)
  {
    T->left = insert(X,T->left);
    if(height(T->left)-height(T->right)==2)
    {
      if(X<T->left->element)
T = singlerotatewithleft(T);
      else
T = doublerotatewithleft(T);
    }
  }
  else if(X>T->element)
  {
    T->right=insert(X,T->right);
    if(height(T->right)-height(T->left)==2)
    {
      if(X>T->right->element)
T= singlerotatewithright(T);
      else
T=doublerotatewithright(T);
    }
  }
  T->height = max(height(T->left),height(T->right))+1;
  return T;
}

inorder(avltree ptr)
{
  if(ptr!=NULL)
  {
     inorder(ptr->left);
     printf("%d ",ptr->element);
     inorder(ptr->right);
  }
}

display(avltree ptr,int level)
{
  int i;
  if(ptr!=NULL)
  {
    display(ptr->right,level+1);
    printf("\n");
    for(i=0;i<level;i++)
      printf(" ");
    printf("%d",ptr->element);
    display(ptr->left,level+1);
  }
}

void main()
{
  clrscr();
  int choice=0,data;
  avltree T;
  position p;
  T=makeempty(NULL);
  while(1)
  {
    printf("\n\n 1.Insert");
    printf("\n\n 2.Display");
    printf("\n\n 3.Exit\n");
    printf("\n\n Enter your choice:");
    scanf("%d",&choice);
    if(choice==3)
      break;
    switch(choice)
    {
      case 1:
printf("\n\n Enter the value to be inserted:");
scanf("%d",&data);
if(find(data,T)==NULL)
    T=insert(data,T);
else
  printf("\n\n Duplicate value ignored\n");
break;
      case 2:
if(T==NULL)
{
  printf("\n Empty tree...");
  continue;
}
printf("\n\n");
display(T,1);
printf("\n\n Inorder traversal of Tree is:");
inorder(T);
break;
      default:
printf("\n wrong choice...");
break;
    }
  }
  getch();
}


OUTPUT


1.Insert
2.Display
3.Exit

Enter your choice:1

Enter the value to be inserted:23

1.Insert
2.Display
3.Exit

Enter your choice:1

Enter the value to be inserted:16

1.Insert
2.Display
3.Exit

Enter your choice:1

Enter the value to be inserted:35

1.Insert
2.Display
3.Exit

Enter your choice:1

Enter the value to be inserted:12

1.Insert
2.Display
3.Exit

Enter your choice:1

Enter the value to be inserted:24

1.Insert
2.Display
3.Exit

Enter your choice:2


35
   24
23
  16
   12


Inorder traversal of Tree is:12 16 23 24 35

1.Insert
2.Display
3.Exit

Enter your choice:3

Sunday, May 1, 2011

Ubuntu 11.04 Screenshots

I downloaded Ubuntu 11.04 on its release date (28th of April) and found it really good...Hmmm where to begin??? First the ubuntu's attempt to shift the focus from gnome to its Unity interface...It may be looking odd in the beginning but I am sure we will be used to it as the time progresses...Given below are some screenshots of my computer loaded with ubuntu 11.04..

The new looking Desktop


Ubuntu now comes with a preloaded Banshee Meida Player

When you play those media files you will find it getting added to the panel in the 'audio' control side.


A new looking Application Browser


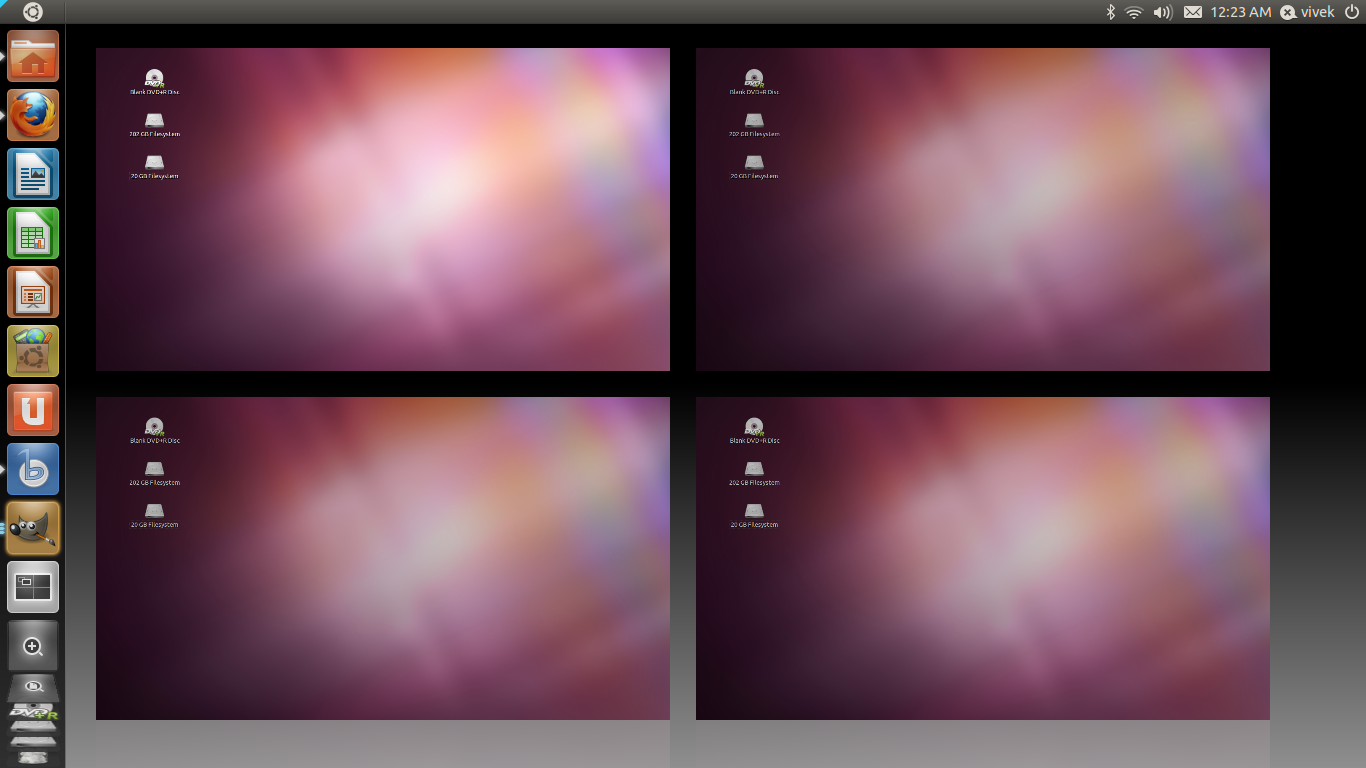
The Desktop Switcher


This version is considered to be the perfect replacement for Windows..;)