Monday, October 17, 2011

Brief History of Open Source Software


Free Software VS Proprietary Software

It could be said that in the beginning, there was only free (libre) software. Later on, proprietary software  was  born,  and  it  quickly  dominated  the  software  landscape,  to  the  point  that  it  is today considered as the only possible model by many people. Only recently has the software industry considered free software as an option again.

When IBM and others sold the first large-scale commercial computers, in the 1960s, they came with some software which was free , in the sense that it could be freely shared among users, it came with source code, and it could be improved and modified. In the late 1960s, the situation changed  after  the  "unbundling"  of  IBM  software,  and  in  mid-1970s  it  was  usual  to  find
proprietary  software,  in  the  sense that  users  were  not  allowed  to  redistribute  it,  that  source code was not available, and that users could not modify the programs. 

Inception of Open Source Software Movement

In late 1970s and early 1980s, two different groups were establishing the roots of the current
open source software movement:

• On  the  US  East  coast,  Richard  Stallman,  formerly  a  programmer  at  the  MIT  AI  Lab, resigned,  and  launched  the  GNU  Project  and  the  Free  Software  Foundation.  The ultimate  goal  of  the  GNU  Project  was  to  build  a  free  operating  system,  and  Richard started by coding some programming tools (a compiler, an editor, etc.). As a legal tool, the  GNU  General  Public  License  (GPL)  was  designed  not  only  to  ensure  that  the
software produced by GNU will remain free, but to promote the production of more and more  free  software.  On  the  philosophical  side,  Richard  Stallman  also  wrote  the  GNU Manifesto,  "stating  that  availability  of  source  code  and  freedom  to  redistribute  and modify software are fundamental rights.”

• On the US West coast, the Computer Science Research Group (CSRG) of the University of  California  at  Berkeley  was  improving  the  Unix  system,  and  building  lots  of applications  which  quickly  become  ”BSD  Unix''.  These  efforts  were  funded  mainly  by DARPA  contracts,  and  a  dense  network  of  Unix  hackers  around  the  world  helped  to debug,  maintain  and  improve  the  system.  During  many  time  that  software  was  not
redistributed outside the community of holders of a Unix AT&T licence. But in the late 1980s, it was finally distributed under the “BSD licence'', one of the first open source licences. Unfortunately, at that time every user of BSD Unix also needed an AT&T Unix licence,  since  some  parts  of  the  kernel  and  several  important  utilities,  which  were needed for a usable system, were still proprietary. Early 1990s During the 1980s and early 1990s, open source software continued its development, initially in several relatively isolated groups. USENET and the Internet helped to coordinate transnational
efforts,  and  to  build  up  strong  user  communities.  During  1991-1992,  the  whole  landscape  of open source software and of software development in general, was ready to change. Two very exciting events were taking place, although in different communities: 

• In California, Bill Jolitz was implementing the missing portions to complete the Net/2 distribution,  until  it  was  ready  to  run  on  i386-class  machines.  Bill  called  his  work 386BSD,  and  it  quickly  became  appreciated  within  the  BSD  and  Unix  communities.  It included not only a kernel, but also many utilities, making a complete operating system.

• In Finland, Linus Torvalds, a student of computer science, unhappy with Tanenbaum's Minix, was implementing the first versions of the Linux kernel. Soon, many people were collaborating to make that kernel more and more usable, and adding many utilities to complete   GNU/Linux,   a   real   operating   system.   The   Linux   kernel,   and   the   GNU applications used on top of it are covered by GPL. 

1990s – The Golden Period

In 1993, both GNU/Linux and 386BSD were reasonably stable platforms. Since then, 386BSD has evolved into a family of BSD based operating systems (NetBSD, FreeBSD, and OpenBSD), while the  Linux  kernel  is  healthy  evolving  and  being  used  in  many  GNU/Linux  distributions Slackware, Debian, Red Hat, Suse, Mandrake, and many more). 

During  the  1990s,  many  open  source  projects  have  produced  a  good  quantity  of  useful  (and usually high-quality) software. Some of them are Apache (widely used as a WWW server), Perl(an   interpreted   language   with   lots   of   libraries),   XFree86   (the   most   widely   used   X11
implementation for PC-based machines), GNOME and KDE (both providing a consistent set of libraries and applications to present the casual user with an easy to use and friendly desktop environment),  Mozilla  (the  free  software  project  funded  by  Netscape  to  build  a  WWW browser), etc. Of all these projects, GNOME and KDE are especially important, because they address usability by non-technical people.

The  late  1990s  are  very  exciting  times  with  respect  to  open  source  software.  Open  source systems based on GNU/Linux or *BSD are gaining public acceptance, and have become a real alternative  to  proprietary  systems,  competing  head  to  head  with  the  market  leaders  (like Windows NT in servers). In many niches, the best choice is already open source (an outstanding case is Apache as Web server, with a market share consistently over 50%). 

Intoduction to Open Source Software

OPEN SOURCE

Open  source  is  a  development  method  for  software  that  harnesses  the  power  of  distributed peer review and transparency of process. The promise of open source is better quality, higher reliability, more flexibility, lower cost, and an end to predatory vendor lock-in.

THE OPEN SOURCE DEFINITION

The definition of Open Source according to the OSI (Open Source Initiative) is as follows:

Open  source  doesn't  just  mean  access  to  the  source  code.  The  distribution  terms  of  open-source software must comply with the following criteria:

1. Free Redistribution

The license shall not restrict any party from selling or giving away the software as a component of an aggregate software distribution containing programs from several different sources. The license shall not require a royalty or other fee for such sale.

2. Source Code

The program must include source code, and must allow distribution in source code as well as compiled form. Where some form of a product is not distributed with source code, there must be  a  well-publicized  means  of  obtaining  the  source  code  for  no  more  than  a  reasonable reproduction  cost  preferably,  downloading  via  the  Internet  without  charge.  The  source  code must  be  the  preferred  form  in  which  a  programmer  would  modify  the  program.  Deliberately obfuscated   source   code   is   not   allowed.   Intermediate   forms   such   as   the   output   of   a preprocessor or translator are not allowed.

3. Derived Works

The license must allow modifications and derived works, and must allow them to be distributed under the same terms as the license of the original software.

4. Integrity of the Author's Source Code

The license may restrict source-code from being distributed in modified form only if the license allows the distribution of "patch files" with the source code for the purpose of modifying the program  at  build  time.  The  license  must  explicitly  permit  distribution  of  software  built  from modified  source  code.  The  license  may  require  derived  works  to  carry  a  different  name  or version number from the original software.

5. No Discrimination against Persons or Groups

The license must not discriminate against any person or group of persons.

6. No Discrimination against Fields of Endeavor

The  license  must  not  restrict  anyone  from  making  use  of  the  program  in  a  specific  field  of endeavor. For example, it may not restrict the program from being used in a business, or from being used for genetic research.

7. Distribution of License

The  rights  attached  to  the  program  must  apply  to  all  to  whom  the  program  is  redistributed without the need for execution of an additional license by those parties.

8. License Must Not Be Specific to a Product

The rights attached to the program must not depend on the program's being part of a particular software distribution. If the program is extracted from that distribution and used or distributed within  the  terms  of  the  program's  license,  all  parties  to  whom  the  program  is  redistributed should have the same rights as those that are granted in conjunction with the original software distribution.

9. License Must Not Restrict Other Software

The  license  must  not  place  restrictions  on  other  software  that  is  distributed  along  with  the licensed software. For example, the license must not insist that all other programs distributed on the same medium must be open-source software.

10. License Must Be Technology-Neutral

No provision of the license may be predicated on any individual technology or style of interface.

Saturday, October 1, 2011

Installing Samba and Sharing files with windows

AIM

To install SAMBA(Server Message Block) in the linux system and share the files to windows OS.

INTRODUCTION

Samba allows file and print sharing between computers running Windows and computers running Unix. It is an implementation of dozens of services and a dozen protocols. Samba sets up network shares for chosen Unix directories (including all contained subdirectories). These appear to Microsoft Windows users as normal Windows folders accessible via the network. Integrating Fedora Linux into a Windows network is reasonable and easy as long as we use the SAMBA utilities.

First, we must allow the Linux server full rights and access to the Windows workgroup and local domain. That means that either in our Active Server environment we need to reserve an IP address for the Linux server, or we simply need to ensure a hard coded IP address is given to the Linux server.   The server must have a reserved IP address whether we deliver it via DHCP or statically assign it in the DNS. This also means that we need to ALLOW SMB DAEMON to operate. We can ensure our system security does this by editing our Firewall setup or using system-config-securitylevel.

Second, we must ensure that SAMBA (SAMBA tools and the SMB protocol) is installed and running on the Linux server.   Most versions of Fedora come with the necessary packages. We should also be sure to update our SAMBA security levels properly if we are having trouble accessing a shared directory. This is found under Samba Server Configuration tool, main menu Properties, option Server Settings, and then the tab: Security.

Now we are ready to configure our Fedora Linux/SAMBA machine (SAMBA Server).

PROCEDURE

1.    SMB(Server Message Block) is a protocol used by Microsoft family of OS for file and print sharing.

2.    Open the window terminal in linux and check whether SAMBA package is installed or not.
$rpm –qa|grepsamba

It will display the SAMBA packages installed in linux machine.

3.    Switch to supervisor$su(root) mode give the password. 

4.    Now check whether SAMBA service is started or not. By default it is running,else we have to start SAMBA services.
#service smb status
It displays SAMBA is stopped.

#service smb start
It will start the SAMBA service.

5.    Similarly check for NMB.
#service nmb status
#service nmb start

6.    Stop the IP table services.
#service ip tables stop
Similarly stop the IP version 6 table.
#service ip6tables stop

7.    Type getenforce   (disabled)
Type setenforce 0 set enforce: SE Linux is disabled.

8.    Now add,smbusername and password.

To add username Type
#useradd winuser
To give password, Type
#smbpasswd –a winuser
New SMB password: admin
Retype new SMB password: admin
Added user winuser.

9.    After adding SAMBA user, we have to restart the SAMBA service.

10.    Access the SAMBA server from windows. You are now ready to use the SAMBA server for your work.

11.    On the windows PC, click start menu and choose host name of SAMBA server and give the IP address of SAMBA server.

12.    If it works well, you can see a server login windows give the SAMBA username and password created in the precious steps.

13.    Now you can access the shared folders in the windows machine.


(Sample Screenshots)


Installing Common Unix Printing System (CUPS)

AIM

To install the Common Unix Printing system into the local system.

INTRODUCTION

CUPS is the standards-based, open source printing system developed by Apple Inc. for Mac OS® X and other UNIX®-like operating systems. A computer running CUPS is a host that can accept print jobs from client computers, process them, and send them to the appropriate printer.

CUPS consists of a print spooler and scheduler, a filter system that converts the print data to a format that the printer will understand, and a backend system that sends this data to the print device. CUPS uses the Internet Printing Protocol (IPP) as the basis for managing print jobs and queues.

CUPS can be downloaded from the internet link http://www.cups.org/software.php

(In this post an example for adding HP printer is given) 

PROCEDURE

1.    Open the terminal window in linux and check whether the CUPS installed or not.
$rpm –qa|grep cups
to display the list of CUPS packages installed in your system.

2.    Check whether the CUPS services is enabled or not, we need root permission.
$su

3.    Give the password as admin123
#service cups status
4.    Goto browser and type
http://localhost:631/ displays the CUPS 1.4.4 HOMEPAGE

5.    Under CUPS for admin click adding printer and classes link.

6.    Under printer click and printer type username and password.
Username: root       password: your_password

7.    Select the local printer option button and select ‘Hp printer(HPLIP)’ and click continue.

8.    To display connection urls and click continue.
In connection type http://localhost:631/

9.    Now type name, description, location of the printer.
Eg: Hp1010           des:Hp1010laserjet printer                  location:lab1   and click contine.

10.    Next select Make from the list as ‘HP’. Click continue.

11.    Select model as list Hp1010  select Hplaserjet 1010,hpcups 3010.6(en) click add printer.

12.    Now it displays set default options of Hp1010 window.

13.    In the general listing you can change the print mode, media size etc. Click set default options.

14.    It displays printer Hp1010 default option have been set successfully, now click the Hp10101 link and maintenance is sample paper print. 


(Sample Screenshot)

Wednesday, September 21, 2011

Running PHP Programs

PHP + MySQL Program

Question - To create simple applications like login forms after setting up a LAMP Stack.

Here however we are designing a PHP application that obtains the information from a student and stores it in the MySQL database.

(This post assumes that you have created a LAMP Stack. If not Click Here to refer to my previous post) 


Steps Involved


1.       Go to the terminal and login as root.

2.       Move to the /var/www/html folder by entering the following command:
[root@fosslab fosslab]# cd /var/www/html

3.       Create a filenamed ‘phpdata.php’ using vi editor.

[root@fosslab html]# vi phpdata.php

Now inside enter the following code

phpdata.php

<html>

<head>

                <title>Student Registration!</title>

</head>

<body bgcolor="lightgreen">

<b><center>    <h2>Student Registration Form</h2>

                    <form action="handle_register.php" method="post">

                    <table cellpadding="10" cellspacing="10">          

                    <tr>

                    <td><label for="lbl_name">Name</td>

                    <td><input type="text" name="name" ></td>

                    </tr>

                    <tr>

                    <td><label for="lbl_email">Email Id</td>

                    <td><input type="text" name="email"></td>

                    </tr>

                    <tr>

                    <td><label for="lbl_mobile">Mobile Number</td>

                    <td><input type="text" name="mobile"></td>

                    </tr>

                    <tr>

                    <td><label for="lbl_college">College</td>

                    <td><input type="text" name="college"></td>

                    </tr>

                    <tr>

                    <td><label for="lbl_degree">Degree</td>

                    <td><input type="text" name="degree"></td>

                    </tr>

                    <tr>

                    <td><label for="lbl_branch">Branch</td>

                    <td><input type="text" name="branch"></td>

                    </tr>

                    <tr>

                    <td><label for="lbl_year">Year</td>

                    <td><input type="text" name="year"></td>

                    </tr>

                    <tr>

                    </table>    

                    <input type="submit" value="Register" name="Submit">

                                    </form></center></b>                          

</body>

</html>

4.       Now save the file and create another one named ‘handle_register.php’.
[root@fosslab html]# vi handle_register.php

Now enter the following code:

handle_register.php


<?php

if($_POST['name']=="" || $_POST['email']=="" || $_POST['mobile']=="" || $_POST['college']=="" || $_POST['degree']=="" || $_POST['branch']=="" || $_POST['year']=="")

{

echo "<h3>Please go back and fill in all the details.</h1>";

die();

}

else

{

$name = $_POST['name'];

$email = $_POST['email'];

$mobile = $_POST['mobile'];

$college = $_POST['college'];

$degree = $_POST['degree'];

$branch = $_POST['branch'];

$year = $_POST['year'];

$connect = mysql_connect("localhost","root","admin123") or die( "Unable to select database");

mysql_select_db("register");

$query = "SELECT * from students where Email='$email'";

$results = mysql_query($query);

$query = "INSERT INTO students (Name,Email,Mobile,College,Degree,Branch,Year) VALUES ('$name','$email','$mobile','$college','$degree','$branch','$year')";

$results = mysql_query($query);

echo "<h2>Thank you " . $name . " for registering.</h2>";

echo "<br><br>List of Students Enrolled:<br><br>";

echo "<table border='2' cellpadding='3'><tr><td>Name</td><td>Email</td><td>Mobile</td><td>College</td><td>Degree</td><td>Branch</td><td>Year</td></tr>";

$query = "SELECT * from students";

$results = mysql_query($query);

while($info = mysql_fetch_array($results))

{

echo "<tr><td>".$info['Name']."</td><td>".$info['Email']."</td><td>".$info['Mobile']."</td><td>".$info['College']."</td><td>".$info['Degree']."</td><td>".$info['Branch']."</td><td>".$info['Year']."</td></tr>";

}

echo "</table>";

}

mysql_close();

?>

Now you have completed your coding part. Next step is to create database in MySQL. We use PhpMyAdmin for it.

Steps for creating database in PhpMyAdmin

1.       In your browser type http://localhost/phpmyadmin

2.       Click the Databases tab. In the Create New Databse textbox type register and click create. 

3.       Next in the create new table frame enter name as ‘students’ and number of fields as ‘7’. Click Go. Now fill in the following

Field
Type
Name
Text
Email
Text
Mobile
Text
College
Text
Degree
Text
Branch
Text
Year
Text
4.        
      Now finally click Save button below.
5.       Now that’s it!! You have created the database.

Executing the Program

1.       Go to the browser and type http://localhost/phpdata.php.

2.       Fill in the details (all details) and click Register.

3.       Now in the next page a Thank you message and list of entries in database will come indicating the success of the program.

Download the Source Code

Saturday, August 20, 2011

Setting up a LAMP Stack in Fedora 14

In this post let us see how to setup a LAMP Stack. LAMP is an acronym for a solution stack of free, open source software, originally coined from the first letters of Linux (operating system), Apache HTTP Server, MySQL (database software) and Perl/PHP/Python, principal components to build a viable general purpose web server.

Setting up this LAMP stack is essential for you to design websites and test it in your local computer.


1. Installing MySQL 5

To install MySQL type the following command in the Terminal:

yum install mysql mysql-server

In order to make MySQL start automatically whenever the system boots, type

chkconfig --levels 235 mysqld on

To Start the MySQL server

/etc/init.d/mysqld start

To set password for MySQL enter,

mysql_secure_installation

The intial password for 'root' is nothing.. So just press enter..It will prompt if you want to change it. Then press 'Y', current password "blank(press enter)" and enter the new password what you want..

2. Installing Apache 2

To install Apache 2 enter the following command

yum install httpd

Now configure your system to start Apache at boot time...

chkconfig --levels 235 httpd on

To start Apache

/etc/init.d/httpd start

To check if it has been installed,

Go to the browser and enter http://localhost

You must see a Fedora Test Page.


3. Installing PHP 5

Enter the following command

yum install php

Then restart apache,

/etc/init.d/httpd restart

The default directory for all PHP files is /var/www/html.

So place any .php file there and then test it as http://localhost/YourFileName.php.

4. Installing MySQL (to be used with PHP)

Enter the following command

yum install php-mysql 

Restart the apache as mentioned in the previous step. 

5. Installing PhpMyAdmin

phpMyAdmin is a free software tool written in PHP intended to handle the administration of MySQL over the World Wide Web. phpMyAdmin supports a wide range of operations with MySQL. The most frequently used operations are supported by the user interface (managing databases, tables, fields, relations, indexes, users, permissions, etc), while you still have the ability to directly execute any SQL statement.

To install PhpMyAdmin enter the following:


yum install phpmyadmin 

Restart Apache.  

Thats it!!! Its done. Now you are ready to use LAMP...:) 

Monday, July 25, 2011

Cyborgs 2k11

Cyborgs 2k11 (Brain over Brawn)


Cyborgs 2k11 is a National Level Technical Symposium conducted by the Department of Computer Science and Engineering at Valliammai Engineering College,Chennai, on 11th and 12th of August, 2011.

Following the grand success of Cyborgs 09, the CS Adroits association is back with yet another mega event of the year, CYBORGS 2K11.

CYBORGS 2K11 will be a showcase of the skills of some of the best Brains in the country. On the floor, is a plethora of challenging events testing your technical and non-technical skills that spans over two days. We are very proud to welcome you to this Brain Stimulating event and have absolute fun and frolic with our CS Adroits Family. Participate, Enjoy, Succeed, Shine. Its time to prove the might of Brain over Brawn.

Prizes Worth Rs.1,00,000 to be won!!!

List of Events in Cyborgs 2k11

  • Thesis Cast (Paper Presentation)
  • Bug Busters (Debugging)
  • Top Coders (Programming)
  • Tech Trivia (Quiz)
  • Ad-Zap
  • Show Bruta (Dumb C)
  • Picturesque (Bingo!)
  • Battle of the Gamers
  • Picaso on Picasa (Digital Art)
  • Puzzle Tuzzle
Our Website - http://cyborgs2k11.com/

Our Chief Guest - Mr.Kiruba Shankar

Our Media Partner


Wednesday, June 1, 2011

Virtualisation Environment

Task / Aim

Virtualisation environment (e.g., xen, kqemu or lguest) to test an applications, new kernels and isolate applications. It could also be used to expose students to other alternate OSs like *BSD

Procedure


What is Virtualisation?

Virtualisation, in computing, is the creation of a virtual (rather than actual) version of something, such as a hardware platform, operating system, a storage device or network resources.

So what we are going to do is to install another operating system say 'Ubuntu' within our host operating system 'Fedora'. Now the 'Ubuntu' contained within the virtual machine is called as the guest Operating System. The software that we are going to use to perform this is the open source software called 'Qemu'


Installing Ubuntu within Fedora using QEMU


  1. The first step involved here is to download the QEMU source code (if it is not already present). You can perform this download by clicking the following link Download QEMU Source code
  2. Next task is to build the emulator from the source code. Go the folder where you have downloaded the source code in the terminal and enter the following two commands:

    • $ tar -zxvf qemu-0.14.0.tar.gz
    • $ cd qemu-0.14.0

  3. Next we are going to configure the qemu script such that it is built for i386 architecture. However it supports various other architectures like ARM, PPC, SPARC etc. Enter the following command:

    • $ ./configure --target-list=i386-softmmu

    (Before doing this make sure you have installed Header files and libraries for zlib development. If you haven't then go to 'Add/Remove software' app in Fedora and do it and then configure your script)
  4. Once you are done with configuring now you have to install it. For doing so, you must login as root in your terminal using the 'su' command. After that use the 'make' command to install it.

    • $ su
    • Password: (This is not a command, but will come when you enter su)
    • # make install

  5. Now you have installed qemu. Next step is to create the virtual machine. The first step in that is to create a Virtual Hard disk image for that. For our Ubuntu OS let us a create an Hard disk of size 10 GB. To create that go to a folder where you want to create the hard disk image and enter the following:

    • $ qemu-img create ubuntu.img 10G
    • $ ls -lh ubuntu.img (To check)

  6. So you have created the hard disk. What next??? Yes..To install Ubuntu into it. You have to download ubuntu and place its .iso image in the current working directory.
    Then execute the following commands

    • qemu -hda ubuntu.img --boot d -cdrom ./ubuntu-10.10-desktop-i386.iso -m 512

    In the above command, '-hda' option specifies the disk image file, '-cdrom' is the CD-ROM or iso image to be used and '-m' option specifies the memory to be allocated for the guest OS. In this case it is 512 MB of RAM.

    Now our Virtual machine is ready. Just got to install ubuntu in it. The screenshot is given below:

** Here we have build the software from the source. If you find it complicated you can always use fedora's "yum".... Just install using the command 'yum install qemu' and after that see 5th and 6th points given here.

*** This may be revised in future. Stay tuned for updates. If you find any problem or have any suggestions for improvements, you can always mail me.

By G.Vivek Venkatesh

Sunday, May 29, 2011

Implementation of AVL Tree

In this post I will give the C program for the implementation of AVL tree.

AVL TREE


In computer science, an AVL tree is a self-balancing binary search tree, and it was the first such data structure to be invented.In an AVL tree, the heights of the two child subtrees of any node differ by at most one. Lookup, insertion, and deletion all take O(log n) time in both the average and worst cases, where n is the number of nodes in the tree prior to the operation. Insertions and deletions may require the tree to be rebalanced by one or more tree rotations.

ALGORITHM


Program written based on the algorithm given in the book "Data Structures and Algorithm Analysis in C " written by Mark Allen Weiss.

PROGRAM


#include<stdio.h>
#include<conio.h>
#include<malloc.h>
struct avlnode;
typedef struct avlnode *position;
typedef struct avlnode *avltree;
struct avlnode
{
  int element;
  avltree left;
  avltree right;
  int height;
};

avltree makeempty(avltree T)
{
  if(T!=NULL)
  {
    makeempty(T->left);
    makeempty(T->right);
    free(T);
  }
  return NULL;
}

position find(int X,avltree T)
{
  if(T==NULL)
    return NULL;
  if(X<T->element)
    return find(X,T->left);
  else if(X>T->element)
    return find(X,T->right);
  else
    return T;
}

static int height(position p)
{
  if(p==NULL)
    return -1;
  else
    return p->height;
}

static int max(int lhs,int rhs)
{
  return lhs>rhs ? lhs : rhs;
}

static position singlerotatewithleft(position k2)
{
  position k1;
  k1=k2->left;
  k2->left = k1->right;
  k1->right = k2;
  k2->height = max(height(k2->left),height(k2->right))+1;
  k1->height = max(height(k1->left),k2->height)+1;
  return k1;
}

static position singlerotatewithright(position k1)
{
  position k2;
  k2=k1->right;
  k1->right = k2->left;
  k2->left = k1;
  k1->height = max(height(k1->left),height(k1->right))+1;
  k2->height = max(height(k2->right),k1->height)+1;
  return k2;
}

static position doublerotatewithleft(position k3)
{
  k3->left = singlerotatewithright(k3->left);
  return singlerotatewithleft(k3);
}

static position doublerotatewithright(position k1)
{
  k1->right = singlerotatewithleft(k1->right);
  return singlerotatewithright(k1);
}

//////Insert routine

avltree insert(int X,avltree T)
{
  if(T==NULL)
  {
    T=(avlnode*)malloc(sizeof(struct avlnode));
    if(T==NULL)
      return NULL;
    else
    {
      T->element=X;
      T->height=0;
      T->left=T->right=NULL;
    }
  }
  else if(X<T->element)
  {
    T->left = insert(X,T->left);
    if(height(T->left)-height(T->right)==2)
    {
      if(X<T->left->element)
T = singlerotatewithleft(T);
      else
T = doublerotatewithleft(T);
    }
  }
  else if(X>T->element)
  {
    T->right=insert(X,T->right);
    if(height(T->right)-height(T->left)==2)
    {
      if(X>T->right->element)
T= singlerotatewithright(T);
      else
T=doublerotatewithright(T);
    }
  }
  T->height = max(height(T->left),height(T->right))+1;
  return T;
}

inorder(avltree ptr)
{
  if(ptr!=NULL)
  {
     inorder(ptr->left);
     printf("%d ",ptr->element);
     inorder(ptr->right);
  }
}

display(avltree ptr,int level)
{
  int i;
  if(ptr!=NULL)
  {
    display(ptr->right,level+1);
    printf("\n");
    for(i=0;i<level;i++)
      printf(" ");
    printf("%d",ptr->element);
    display(ptr->left,level+1);
  }
}

void main()
{
  clrscr();
  int choice=0,data;
  avltree T;
  position p;
  T=makeempty(NULL);
  while(1)
  {
    printf("\n\n 1.Insert");
    printf("\n\n 2.Display");
    printf("\n\n 3.Exit\n");
    printf("\n\n Enter your choice:");
    scanf("%d",&choice);
    if(choice==3)
      break;
    switch(choice)
    {
      case 1:
printf("\n\n Enter the value to be inserted:");
scanf("%d",&data);
if(find(data,T)==NULL)
    T=insert(data,T);
else
  printf("\n\n Duplicate value ignored\n");
break;
      case 2:
if(T==NULL)
{
  printf("\n Empty tree...");
  continue;
}
printf("\n\n");
display(T,1);
printf("\n\n Inorder traversal of Tree is:");
inorder(T);
break;
      default:
printf("\n wrong choice...");
break;
    }
  }
  getch();
}


OUTPUT


1.Insert
2.Display
3.Exit

Enter your choice:1

Enter the value to be inserted:23

1.Insert
2.Display
3.Exit

Enter your choice:1

Enter the value to be inserted:16

1.Insert
2.Display
3.Exit

Enter your choice:1

Enter the value to be inserted:35

1.Insert
2.Display
3.Exit

Enter your choice:1

Enter the value to be inserted:12

1.Insert
2.Display
3.Exit

Enter your choice:1

Enter the value to be inserted:24

1.Insert
2.Display
3.Exit

Enter your choice:2


35
   24
23
  16
   12


Inorder traversal of Tree is:12 16 23 24 35

1.Insert
2.Display
3.Exit

Enter your choice:3

Sunday, May 1, 2011

Ubuntu 11.04 Screenshots

I downloaded Ubuntu 11.04 on its release date (28th of April) and found it really good...Hmmm where to begin??? First the ubuntu's attempt to shift the focus from gnome to its Unity interface...It may be looking odd in the beginning but I am sure we will be used to it as the time progresses...Given below are some screenshots of my computer loaded with ubuntu 11.04..

The new looking Desktop


Ubuntu now comes with a preloaded Banshee Meida Player

When you play those media files you will find it getting added to the panel in the 'audio' control side.


A new looking Application Browser


The Desktop Switcher


This version is considered to be the perfect replacement for Windows..;)

Thursday, April 14, 2011

Sentinella: A cool app for Linux

Sentinella is a free desktop application that monitors your system activity and, when a condition is met, takes the action that you've chosen. This simple application written in Qt helps you a lot actually. You can even use this as your automatic shutdown tool.


If you are using Ubuntu then you can install this software from Ubuntu Software center.


(A Screenshot of it running in my computer).

Official Website - http://sentinella.sourceforge.net/


Tuesday, April 5, 2011

Book Bank Management System UML Diagrams

UML Diagrams for Book Bank Management System

Usecase Diagram

Class Diagram

Activity Diagram


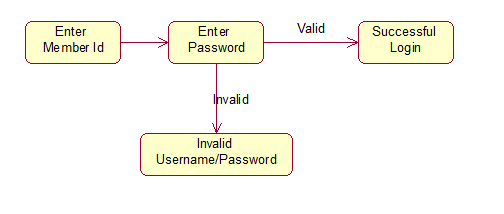
State Chart Diagram

Registration

Authentication

Search Books

Get Books


Sequence Diagram

Registration

Authentication

Search Books


Get Books


Membership Status

Collaboration Diagram

Registration


Authentication

Search Books


Get Books


Membership Status