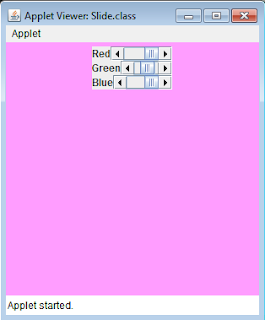
To implement a color palette using a Slider. Here we use three sliders for Red, Blue and Green. Based on the slide value the Redness, Greenness and Blueness gets adjusted and thereby we can bring about all colors.
Download Source Code
Code
import java.awt.*;
import java.awt.event.*;
import javax.swing.*;
import javax.swing.JScrollBar;
import java.applet.*;
public class Slide extends Applet
{
JScrollBar scroll;
JScrollBar scroll1;
JScrollBar scroll2;
JLabel lbl1;
JLabel lbl2;
JLabel lbl3;
JPanel panel1;
JPanel panel2;
JPanel panel3;
JPanel panel;
int redness=0;
int greenness=0;
int blueness=0;
Color co;
public void init()
{
scroll= new JScrollBar(JScrollBar.HORIZONTAL);
scroll.setMaximum(265);
scroll.addAdjustmentListener(new MyAdjustmentListener());
scroll1= new JScrollBar(JScrollBar.HORIZONTAL);
scroll1.setMaximum(265);
scroll1.addAdjustmentListener(new MyAdjustmentListener());
scroll2= new JScrollBar(JScrollBar.HORIZONTAL);
scroll2.setMaximum(265);
scroll2.addAdjustmentListener(new MyAdjustmentListener());
lbl1 = new JLabel("Red");
lbl2 = new JLabel("Green");
lbl3 = new JLabel("Blue");
panel = new JPanel();
panel1 = new JPanel();
panel2 = new JPanel();
panel3 = new JPanel();
panel1.setLayout(new BorderLayout());
panel2.setLayout(new BorderLayout());
panel3.setLayout(new BorderLayout());
panel1.add(lbl1,BorderLayout.WEST);
panel1.add(scroll);
panel2.add(lbl2,BorderLayout.WEST);
panel2.add(scroll1);
panel3.add(lbl3,BorderLayout.WEST);
panel3.add(scroll2);
panel.setLayout(new BorderLayout());
panel.add(panel1,BorderLayout.NORTH);
panel.add(panel2,BorderLayout.CENTER);
panel.add(panel3,BorderLayout.SOUTH);
add(panel,BorderLayout.NORTH);
setSize(300,300);
setVisible(true);
}
class MyAdjustmentListener implements AdjustmentListener
{
public void adjustmentValueChanged(AdjustmentEvent e)
{
if(e.getSource()==scroll)
redness = e.getValue();
else if(e.getSource() == scroll1)
greenness = e.getValue();
else
blueness = e.getValue();
co=new Color(redness,greenness,blueness);
setBackground(co);
repaint();
}
}
}
Screenshots


